Butcher Block Installation Guide
Now that you have purchased your butcher block and it has arrived at your doorstep, it's time to install it! In this butcher block installation guide, we'll cover the 8 steps to get your butcher block ready to use.
Please note: We recommend permanently sealing/finishing your butcher block prior to installation. This is our preferred method for top protection. If you would like to keep your butcher block conditioned using a food safe mineral oil, you will need to regularly condition the bottom as well. (This may cause issues post-installation. If your top is permanently sealed once it is installed, you never need to uninstall or recondition the bottom.)
Also, prior to installation, please note that you shouldn't use any glues, construction adhesives, or epoxies while installing your butcher block countertop. You won't want to use these because they will inhibit your hardwood's natural movement, which may result in eventual cracking or warping.
Order Butcher Block
The Butcher Block Countertop Installation Process
Table of Contents
- Step 1: Make Measurements of the Cabinets
- Step 2: Acclimate Your Butcher Block
- Step 3: Prep Your Cabinets
- Step 4: Prep Your Installation Points
- Step 5: Position for Installation
- Step 6: Install Your Butcher Block
- Step 7: Oil & Condition Your Butcher Block
- Step 8: Regularly Care for Your Butcher Block
Below, we detail the process of installing your butcher block countertops. If you have any questions about proper installation, please don't hesitate to contact our team at (608) 566-6903!
Step 1: Make Measurements of the Cabinets
Begin by creating a detailed drawing of the cabinet layout. Measure the dimensions along all walls and along the fronts of the cabinets to ensure accuracy.
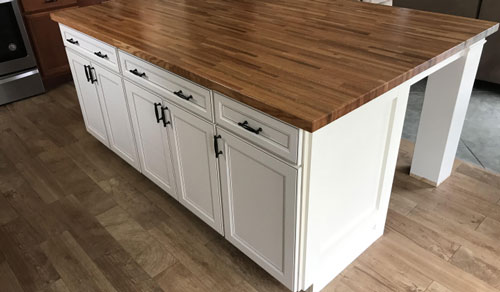
For reference, standard cabinet depths are usually 24 or 24.5" (inches). In this specific project, the cabinets have a depth slightly under 25". This design allows the countertop to extend to the front edge of the cabinets, leaving a small expansion gap of approximately 1/8 inch along the walls. This gap will be concealed with a 4-inch backsplash, ensuring a clean and finished appearance.
Next, measure the depth from the walls to the front edges of the cabinet doors or drawers. Take these measurements at multiple points to account for any variations. This thorough approach will help ensure that the countertop you order fits perfectly and that all components align correctly.
Step 2: Acclimate Your Butcher Block
Now that you have placed an order for your butcher block countertop, once they've arrived, it's important that you acclimate them.
The acclimation process is essentially giving your butcher block wood some time to adapt to the conditions in your house. You will want to acclimate your butcher block for about five days.
Step 3: Prep Your Cabinets
Now that your butcher block countertop wood is acclimated to the conditions in your home, you are now ready to prep your cabinets.
- Does your cabinet have open tops? If so, you will need to install blocking. This creates a surface that you can attach your butcher block to. You will want to utilize a quality grade 3/4" plywood or 1x stock boards for this step. To install the blocking, first drill pilot holes at an angle through the blocking and then screw the blocking to your cabinets. Ensure that you use proper size of screw for blocking installation.
- If instead your cabinets have closed tops, you will want to install furring strips using 1/4" plywood. Cut the strips two inches shorter than the cabinet depth. Repeat this process every 12"-16". You can use kitchen and bath sealant to install the strips. In humid environments, this provides air space and prevents cupping over time.
Order Butcher Block
Step 4: Prep Your Installation Points
The next step involves preparing your installation points. Begin by using a 1/2-inch boring bit to drill holes through the bracing of your cabinets. Make sure to drill these holes at each of your planned installation points. This will provide the necessary openings for secure attachment and ensure that your installation is both precise and stable. Take your time to align the drill bit correctly to avoid any mistakes and to maintain the integrity of the cabinet structure.
Please note: your butcher block needs room to breathe. Based upon the climate and level of humidity they are stored in; they will expand and contract. Keep this in mind when you prep your installation points.
Step 5: Position for Installation
The next step is to position your butcher block exactly as you intend to install it. Carefully align it to ensure a perfect fit. Once you have it in place, locate the center of each hole that you previously drilled with the 1/2-inch boring bit. This can be done from below the butcher block to maintain accuracy.
After identifying the centers, use a smaller drill bit to pre-drill holes. Be sure to mark the depth on the drill bit to prevent drilling all the way through the butcher block. This step is crucial to avoid any accidental damage to the surface of the wood while providing the necessary openings for secure installation.
Step 6: Install Your Butcher Block
Now it's time to fit and secure each of your installation screws using a fender washer. Begin by placing a fender washer over each pre-drilled hole, ensuring that it is centered properly. Then, insert the installation screw through the washer and into the hole.
As you tighten the screws, be mindful not to overtighten them. The goal is to secure the butcher block firmly without restricting its natural ability to expand and contract slightly. A good rule of thumb is to tighten the screw until the fender washer is snug, but still movable with a bit of force. If you find that you cannot move the washer at all, this indicates that the screw is too tight, and you will need to loosen it slightly.
The reason for not overtightening is to allow for some flexibility, which helps accommodate changes in temperature and humidity that can cause the wood to expand or contract. By maintaining this slight adjustability, you prevent undue stress on the wood, which can lead to cracks or warping over time.
Step 7: Oil & Condition Your Butcher Block
To finish preparing your butcher block, you will need to oil it using mineral oil and organic beeswax. (Note that if your butcher block already has a Monocoat or Everlast Varnish finish, you can skip this step).
Start by thoroughly saturating the surface of your butcher block with food-grade mineral oil. Pour a generous amount of oil onto the block and spread it evenly using a clean cloth or paper towel. Allow the oil to soak into the wood for several hours, or ideally, overnight. If the wood absorbs all the oil quickly, apply additional coats until the surface remains slightly moist, indicating it is fully saturated.
After the mineral oil has been absorbed, you can enhance the protection and longevity of your finish by applying a butcher block conditioner that contains organic beeswax. To do this, take a small amount of the conditioner and rub it into the surface of the butcher block using a circular motion. The beeswax will help seal the surface, providing an extra layer of protection and helping to maintain the mineral oil finish for a longer period.
Step 8: Regularly Care for Your Butcher Block
Every three to four weeks, you will need to regularly keep your butcher block countertops oiled with a food-safe mineral oil. Keep in mind that there's no such thing as too much oil. You will also need to remember to oil the bottom of the butcher block as well. Although the oil will not dry up as quickly at the bottom as it will on the top, you will still need to keep the bottom oiled.
Have open-top cabinets? You can apply the oil to your rag and wipe the bottom from inside your cabinet. If you have a closed-top cabinet, you'll need to remove the installation screws and washers to lift the butcher block and oil it/condition it every now and then or as directed. Here also is some info on how to clean your butcher block.
Questions About Butcher Block Countertop Installation?
If you have any question about the butcher block installation process, please do not hesitate to reach out to the experts at Forever Joint Tops by giving us a call at (608) 566-6903. We are your source for beautiful woods like walnut, hard maple, red oak, and hickory countertops. Our company is your source for commercial and residential bar tops, desktops, kitchen islands, table tops, floating shelves, and countertops. Looking for an upgrade to your kitchen and dining area? Here are 3 ideas for how to enhance your butcher block.
Need inspiration for your countertop, desktop, or other butcher block surface? Take a look at some ideas here!
Still considering whether wood countertops are the best choice for your kitchen or dining area? Check out 5 reasons why you should choose wood countertops and also why you should choose butcher block for your next home project here. More on wood countertop installation here.
Order Butcher Block
Further Reading:
- Pros and Cons of Butcher Block Countertops
- Edge Grain vs End Grain Butcher Block Countertops
- How to Style Floating Shelves in Your Kitchen
- 15 Creative Ways to Use Your Butcher Block Floating Shelves
- 8 Reasons Why Restaurant Butcher Block Tables are a Great Choice!
- Floating Wall Shelves: The Ultimate Buying Guide
- Wood Desk Ideas